Learning music with a passion for music will help you discover new sounds on your guitar. Using the E minor scale is a great way to explore these sounds. Right away, you’ll notice that the E minor scale sounds sadder and darker than other major scales that are bright and cheery. This difference comes down to the third note of the scale, which is lowered by a half step to create the melancholy sound of a minor scale. In this lesson, you’ll learn about the notes in the E minor scale, as well as hand and finger positions on your guitar. Building on these basics, we’ll cover chords using the same notes, allowing you to play a harmonized E minor scale. Knowing which chords complement will help you understand lead and rhythm guitar parts written in this scale.
Contents
E minor scale notes
The E minor scale consists of seven notes:
- E
- F#
- G
- A
- B
- C
- D
The “#” symbol next to F indicates that it is “sharp,” which means it is played one fret (or half-step) higher than the natural F note.
Just like any other scale on the guitar, you can play the E minor scale in various positions. Let’s explore each position and the hand and finger placements required to play each note.
E minor scale positions
There is a method to learn how to play the E minor scale by using the guitar neck scale diagrams provided below. These diagrams illustrate numbered dots that indicate where you should place your fingers on the fretboard to play the scale. Each finger on your fretting hand has a corresponding number that shows the proper finger placement for playing this scale. The finger numbers are as follows:
- Index finger
- Middle finger
- Ring finger
- Pinkie finger
The white dots on the diagram represent open strings, which you play without fretting.
Similar to other guitar scales, you can play the E minor scale in various positions. Each position requires specific finger placements and hand positions. In this lesson, we’ll discuss four E minor scale positions.
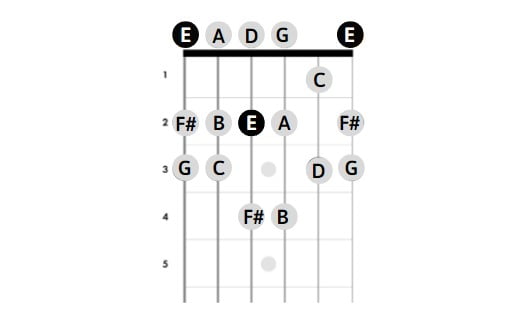
Open position
To play the E minor scale in open position, you only need to place your fingers on the first four frets of your guitar. Your index finger is used to play notes on the first fret, your middle finger for notes on the second fret, your ring finger for notes on the third fret, and your pinkie for notes on the fourth fret.
2nd position
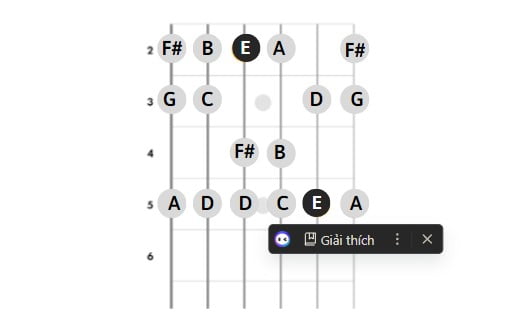
To play the E minor scale at the second position, place your hand one fret up on the guitar. In this position, your index finger plays notes on the second fret, your middle finger plays notes on the third fret, your ring finger plays notes on the fourth fret, and you use your pinkie to play notes on the fifth fret.
7th position
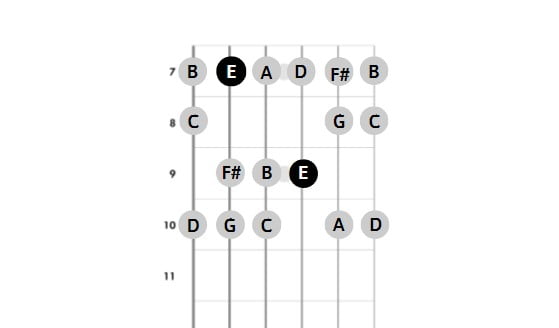
To play the E minor scale in seventh position, you need to position your hand to play notes on the seventh, eighth, ninth, and tenth frets. The diagram below shows the finger positions required for this position.
12th position
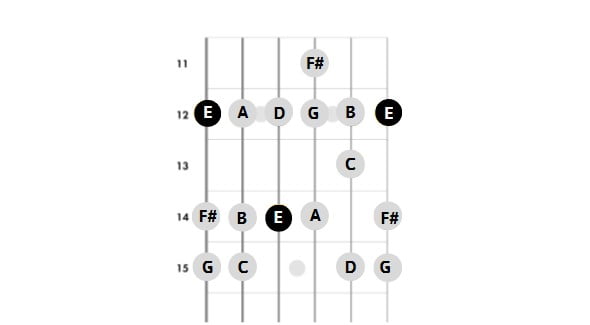
To play the E minor scale in 12th position, you need to play notes on the 12th, 13th, 14th, and 15th frets. The diagram below shows the finger positions required to play this scale in this position.
E minor scale tablature
Open tab position
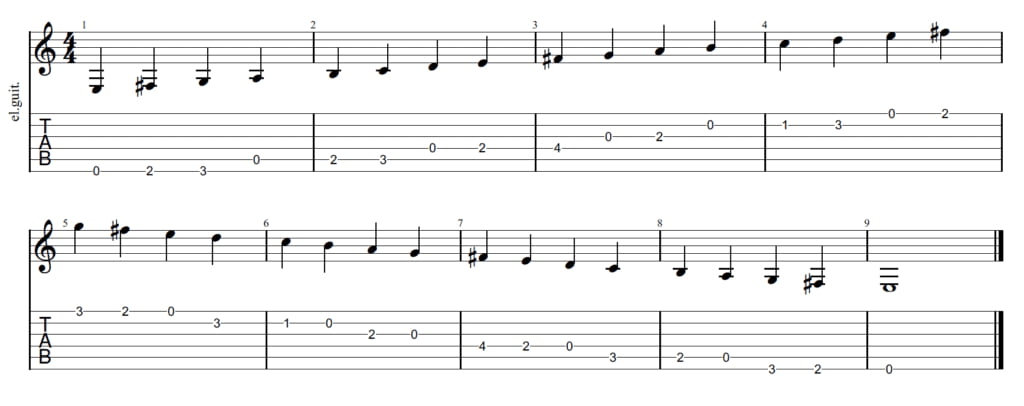
2nd tab position
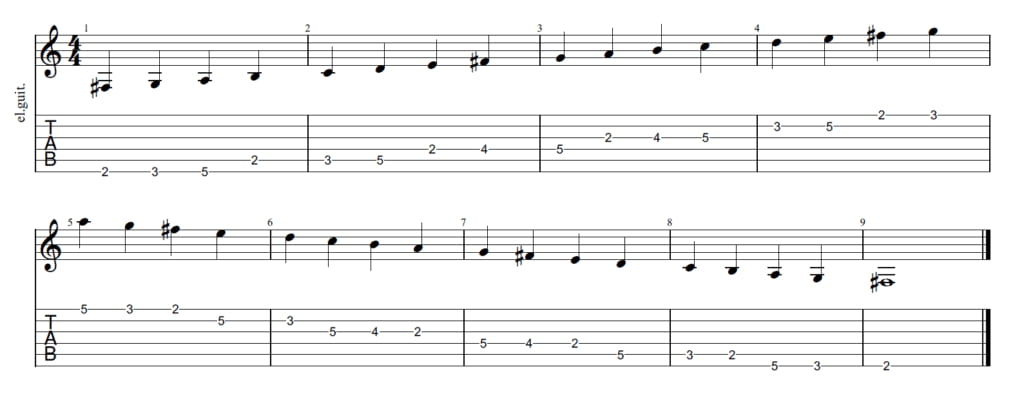
7th tab position
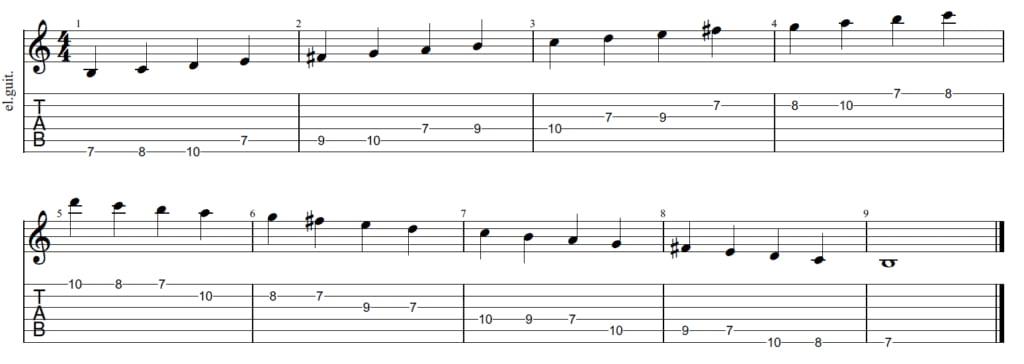
12th tab position
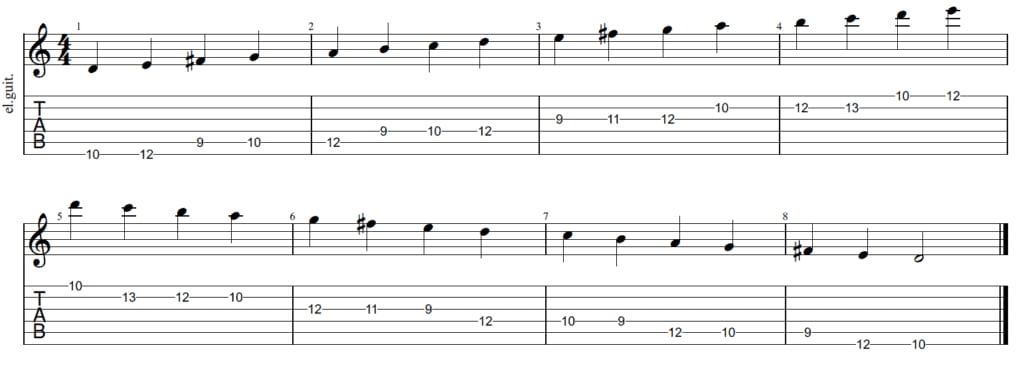
E minor scale exercises
To memorize the this scale, one of the most effective ways is to practice playing up and down the scale in each position. Begin with the root note and play up the scale: E, F#, G, A, B, C, D. Then, play back down the scale: D, C, B, A, G, F#, E.
Before attempting exercises and drills, ensure that you have warmed up by playing the E minor scale slowly in each position, as well as the chords of the E minor scale. It is recommended to start slowly and concentrate on producing clear notes while using the correct finger positions. Once you have developed dexterity and strength, you can gradually increase your speed. Keep learning with our Guitar tunio to have best result.
