How to Refret a Guitar
Refretting a guitar is a complex process that requires patience, attention to detail, and a steady hand. It involves removing the old frets, cleaning the fingerboard, measuring and cutting new frets, installing them, leveling and crowning them, and finally polishing them. In this article, we'll go over each step in detail to help you refret your guitar like a pro.
Guide to refret a guitar step by step
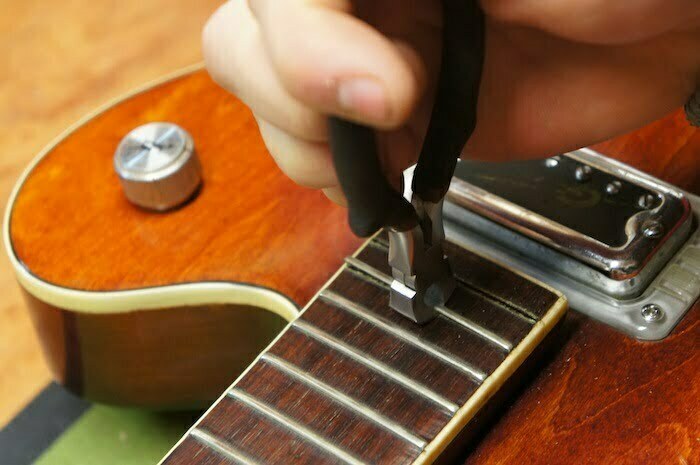
Step 1: Remove the Old Frets
The first step in refretting a guitar is to remove the old frets. This can be done using a fret removal tool or a pair of pliers. Be careful not to damage the fingerboard as you remove the frets. If you encounter any resistance, stop and reevaluate your technique to avoid damaging the fingerboard.
When removing the old frets, it's important to take your time and work carefully. You don't want to damage the fingerboard or the surrounding wood. If you're using a fret removal tool, make sure it's sharp and in good condition. If you're using pliers, be sure to grip the fret firmly and pull it straight out.
Step 2: Clean the Fingerboard
Once the old frets are removed, it's time to clean the fingerboard. Use a soft cloth and some guitar cleaner to remove any dirt, grime, or glue residue left behind from the old frets. This will ensure that the new frets have a clean surface to adhere to.
When cleaning the fingerboard, be sure to use a cleaner that's safe for use on wood. Avoid using harsh chemicals or abrasive materials that could damage the fingerboard. If you're unsure which cleaner to use, consult with a guitar technician or music store professional.
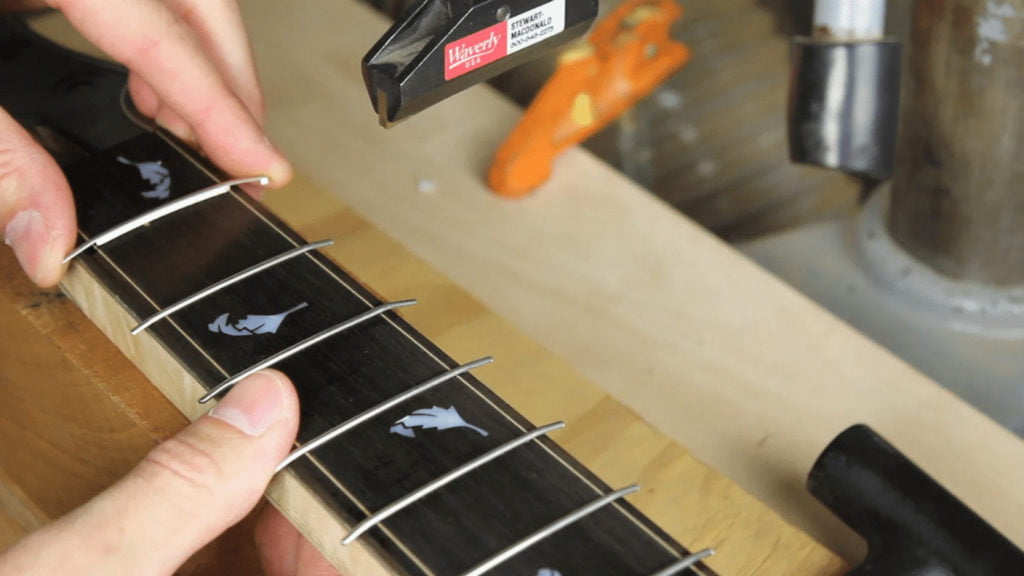
Step 3: Measure and Cut the New Frets
Before cutting the new frets, take accurate measurements of each fret slot. This will ensure that the new frets fit perfectly into their respective slots. Once you have the measurements, cut the new frets to size using a fret cutter. Be sure to file the ends of the frets to ensure a smooth fit.
When measuring for new frets, it's important to be as accurate as possible. Even small variations in size can affect how the guitar plays. If you're unsure about how to measure for new frets, consult with a guitar technician or music store professional.
When cutting the new frets, be sure to use a sharp cutter and work carefully. You don't want to damage the new frets or the surrounding wood. When filing the ends of the frets, be sure to use a fine-grit file and work slowly and carefully.
Step 4: Install the New Frets
Using a fret press or a hammer and caul, install the new frets into their respective slots. Be sure to apply even pressure to ensure they are seated properly. If you're using a hammer and caul, be careful not to damage the fingerboard as you install the new frets.
When installing the new frets, it's important to work slowly and carefully. You don't want to damage the fingerboard or the surrounding wood. If you're using a hammer and caul, be sure to use a soft caul that won't damage the new frets.
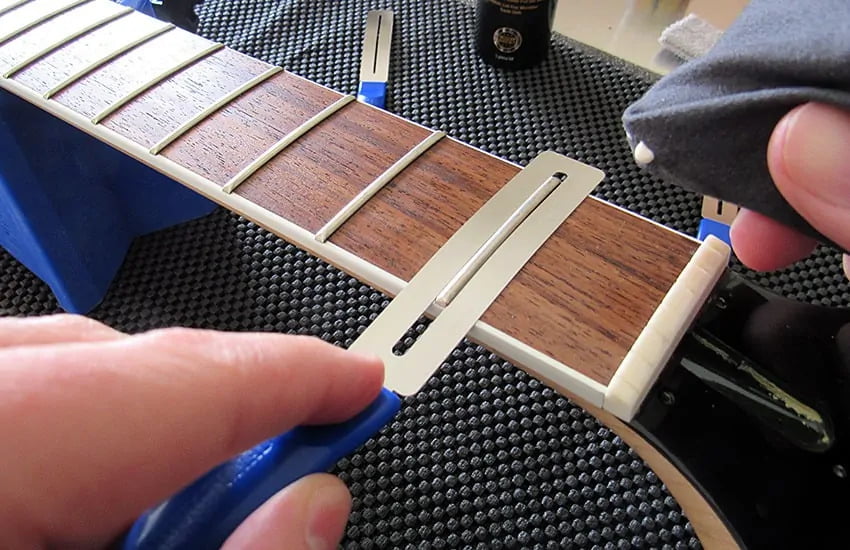
Step 5: Level and Crown the Frets
Once the new frets are installed, use a leveling tool to ensure they are all at the same height. This will ensure that your guitar plays in tune. Then, use a crowning file to shape each fret into a smooth, rounded shape. This will make it easier to play each note cleanly.
When leveling the new frets, be sure to use a straightedge to check for any high spots or low spots. You want all of the frets to be at the same height so that your guitar plays in tune. When crowning the new frets, be sure to use a file that's designed specifically for this purpose.
Step 6: Polish the Frets
Finally, use some fine-grit sandpaper or steel wool to polish the frets to a high shine. This will give your guitar a professional look and feel. Be sure to work carefully and avoid damaging the fingerboard or the surrounding wood.
When polishing the new frets, be sure to use a light touch and work slowly and carefully. You don't want to remove too much material from the frets or damage the surrounding wood. When you're finished polishing, wipe down your guitar with a soft cloth to remove any dust or debris.
Refretting a guitar can be a time-consuming process, but it's well worth it if you want to keep your instrument in top playing condition. With these steps, you'll be well on your way to refret your guitar like a pro. After refretting the guitar, don't forget to tune your guitar to have the best tuning.