How to Play The E Major Scale on Guitar
Learning and memorizing scales, such as the E major scale, can be beneficial in expanding your understanding of music theory. By having a better grasp of the notes that make up a particular scale, you can improve your ability to play songs you enjoy or assist you in your songwriting endeavors.
This lesson will cover how to play the E major scale, including the notes that make up the scale and finger placements for playing the scale in different ways.
NOTES ON THE E MAJOR SCALE
The E major scale has seven notes, four sharps and three natural notes:
- E
- F#
- G#
- A
- B
- C#
- D#
The notes in the E major scale are identical to those in the C# minor scale, except for the tonic notes or starting points. This similarity indicates that C# minor is the relative minor of E major.
The following section will go over the finger placements and various positions required to play the E major scale on the guitar.
E MAJOR SCALE POSITIONS
To make learning the E major scale on the guitar easier, you can use scale diagrams. These diagrams illustrate the fretboard of your guitar and show which notes to play on specific frets and strings.
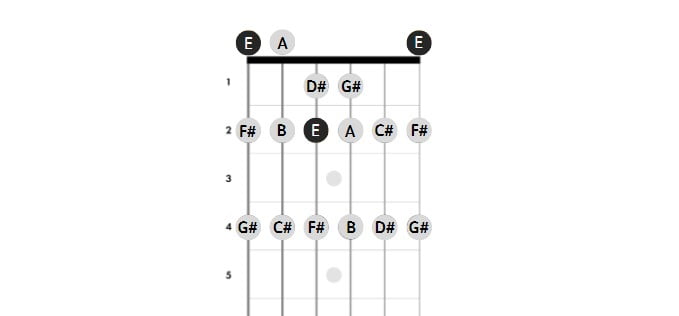
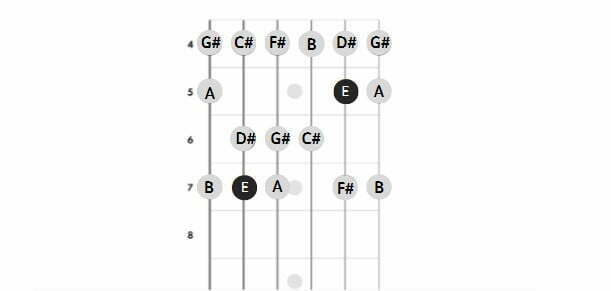
In the diagrams provided below, each dot represents a note to play on a particular string and fret. If there is a circle above a string, play it in an open position, meaning you don't need to hold down any frets. The dark dots on the diagram indicate the root note of the scale, which is E in this case.
There are two different positions of the E major scale that we'll cover in this lesson, which you can practice on your own.
Open position
When playing the E major scale in the open position, use your index finger for notes on the first fret, your middle finger for notes on the second fret, and your pinky for notes on the fourth fret.
Typically, you would use your ring finger to play notes on the third fret, but since there are no notes on the third fret in the open position of the E major scale, you don't need to use your ring finger here. It's much simpler to use your pinky on the fourth fret than to stretch your ring finger to play notes on the fourth fret.
4th position
To play the E major scale in fourth position, place your index finger on the fourth fret, your middle finger on the fifth fret, your ring finger on the sixth fret, and your pinky on the seventh fret.
E MAJOR SCALE TABS
Guitar tabs, also referred to as "tablature," are another way to represent scales, similar to scale diagrams. Using guitar tabs, you can learn scales step-by-step in a different format. Depending on your preference, you may find one style easier to read than the other, and that's perfectly fine!
It's still beneficial to understand how to read both diagrams and tabs since both notations are commonly used. This way, you won't be restricted when seeking out knowledge to further your guitar education.
Now, let's examine guitar tabs for each of the scales we just covered.
Open position tabs
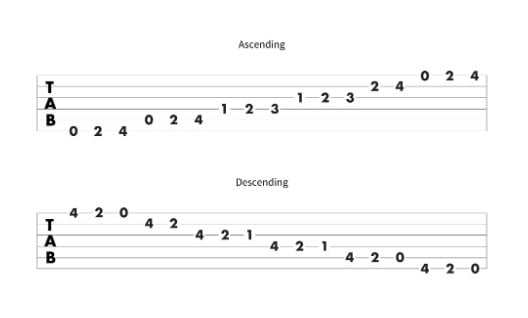
Start by playing an open low E string to play the E major scale in the open position. The remaining scale can be found by continuing to follow the tab. (Pro tip: The numbers match the fret you will be pressing. An open string is indicated by zeros.)
4th position tabs
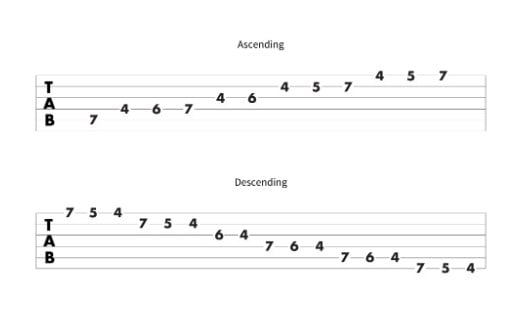
Put your pinky finger on the seventh fret of the A string to begin playing the E major scale in fourth position. Then, proceed as shown by the chart.
E MAJOR SCALE EXERCISES
You can improve your memorizing skills, your understanding of the fretboard, and your picking hand technique by doing multiple exercises.
One of the best methods to memorize scales is to practice them repeatedly. Start out gently while making sure that each note is cleanly fretted and that your finger positioning is appropriate. As you develop finger strength and muscle memory, you can play more quickly. To keep time while playing, get a metronome or tap your foot to the beat.
It might be simplest to begin by playing E major in the open position, but feel free to move as far down the fretboard as position fourth, fifth, or even position twelve. Although we did not cover those positions in this lesson, once you have mastered the ones we did, you can add more positions to your repertory. Learning the notes on the remaining guitar fretboard lets you learn scales in new positions. Moving up and down the fretboard will cause the pitch to change, so pay attention to that.
Finally, practicing scales is the best approach to hone your plucking hand technique. Attempt alternate selecting while performing your scales.
To maintain your hearing and fingers in top shape, incorporate scales into your guitar practice routine on a daily basis! Continue to play and to practice with Guitar tunio


