How To Gain Violin Standard Tuning
Delving into the world of the violin, one quickly realizes that achieving the perfect violin standard tuning is the essential foundation for creating captivating music. The art of tuning a violin is not only about aligning strings to the correct pitches but also about setting the stage for a musical masterpiece. In this guide, we will navigate through the key steps and techniques necessary to attain the precise standard tuning for a violin, enabling every aspiring musician to find their musical voice
What is violin standard tuning?
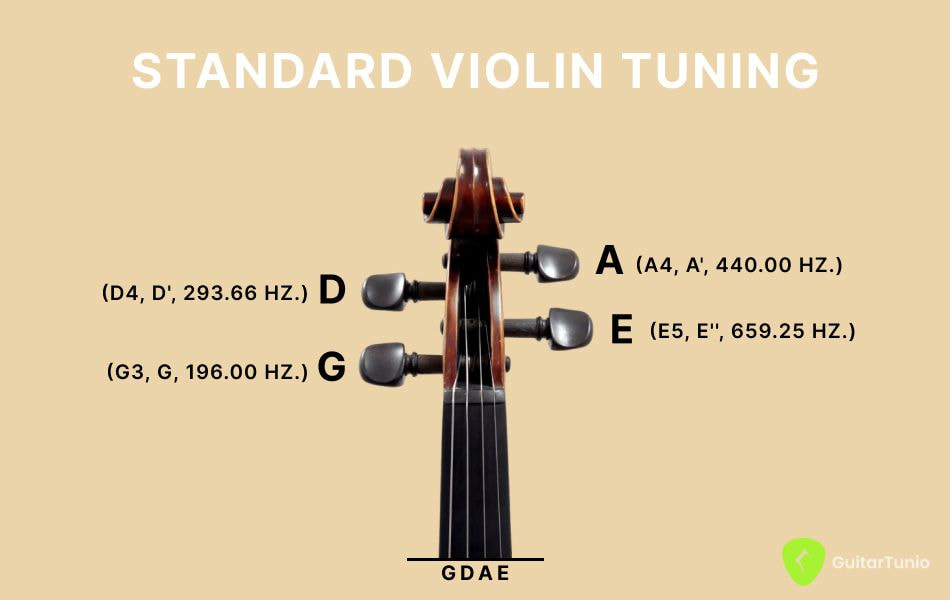
The violin standard tuning is G-D-A-E, from lowest to highest pitch. Each letter corresponds to the string's open pitch when plucked or bowed without pressing down any fingers on the string. Specifically:
- G (G string): The lowest and thickest string, tuned to G3 (196 Hz).
- D (D string): The second string from the bottom, tuned to D4 (293.66 Hz).
- A (A string): The second string from the top, tuned to A4 (440 Hz). This is the reference pitch for orchestras and is the pitch most commonly used for tuning.
- E (E string): The highest and thinnest string, tuned to E5 (659.26 Hz).
These standard tuning notes create a perfect fifth interval between each string, except for the interval between the G and D strings, which is a perfect fourth. It's worth noting that different genres and styles of music may use alternative tunings to achieve a specific sound or accommodate different playing techniques.

How to tune a violin
Tuning a violin involves adjusting the tension in each string to achieve the correct pitch for each string, typically following the standard G-D-A-E tuning. Here's a step-by-step guide on how to tune a violin:
Prepare Your Tuning Device:
Use a violin tuner, a tuning app, or an electronic tuner to help you accurately tune your violin. These devices will guide you to achieve the correct pitch for each string. If you're using a tuning app or electronic tuner, turn it on and make sure it's set to "violin."
Pluck the G string (the thickest string) and observe the tuner. Turn the tuning peg for the G string either clockwise (tune higher) or counter-clockwise (tune lower) until the tuner indicates the correct G note.
Pluck the D string (the second thickest string) and tune it using the same method, adjusting the tuning peg until the tuner indicates the correct D note. Pluck the A string and the E string (the thinnest string) and adjust the tuning peg until the tuner indicates the correct E note.
Play each string again and ensure that they are accurately tuned. Fine-tune the strings as needed using the fine tuners located on the tailpiece, turning them clockwise or counter-clockwise for small adjustments.
Play a few simple tunes or scales to ensure that the violin is in tune and that the notes sound harmonious. Make any final adjustments using the fine tuners to achieve perfect tuning.
Some ways to tune violin
Using tuner app
You can use a violin tuner app or utilize an online tuner, both of which are convenient and simple methods. These tools have the role of calculating and providing accurate sound frequencies, enabling you to achieve the most precise sound.
Guitar Tunio is a remarkable app not only for violin standard tuning but also for many instruments such as guitar, mandolin, uke…The app is designed to be very intelligent and easy to use, even for beginners. With 2 modes, auto and manual, it helps you easily control the sound and tune your violin.

Violin fine tuners
Violin fine tuners are small mechanical devices attached to the tailpiece of a violin. They are used to make precise adjustments to the tension and pitch of each string, allowing the player to fine-tune the instrument for accurate intonation.
Traditionally, violins are tuned using the pegs located at the scroll end of the instrument. However, these pegs can be sensitive, and tuning precisely with them can be challenging, especially for beginners. Fine tuners provide a more convenient and controlled way to adjust the pitch of the strings.
Each string on the violin typically has its own fine tuner. They are usually made of metal and have a screw mechanism. When turned clockwise, the fine tuner tightens the string, raising its pitch. Conversely, turning the fine tuner counterclockwise loosens the string, lowering its pitch. This allows the player to make minor adjustments quickly and accurately.
Tune with a Tuning Fork
Tuning a violin with a tuning fork involves using the fork to generate a specific pitch, which serves as a reference for tuning the strings of the violin.
- Strike the Fork: Tap the tuning fork against a hard surface to initiate sound.
- Position on Violin: Hold the base and touch the fork's ball to your violin or bridge.
- Listen for A Note: Let the violin vibrate and listen for the A note's ringing sound.
- Tune A String: Adjust the A string to match this pitch.
- Tune Other String: Tune the remaining strings to the A string in perfect fifths.
In conclusion, mastering the violin standard tuning is a crucial milestone for any musician. The ability to coax the perfect pitch from each string is akin to tuning the soul of the instrument.


